Batch Export & Backup
Bulk export Perplexity conversations, Spaces, and computer tasks to Notion
Batch Export lets you export large sets of Perplexity data to Notion in one workflow. You can back up regular conversations, sync selected Spaces, or switch the data source to Perplexity computer tasks.
Prerequisites
- Completed Notion authorization
- A Notion database selected for storing conversations
- Perplexity page must be open in a browser tab
Access Batch Export
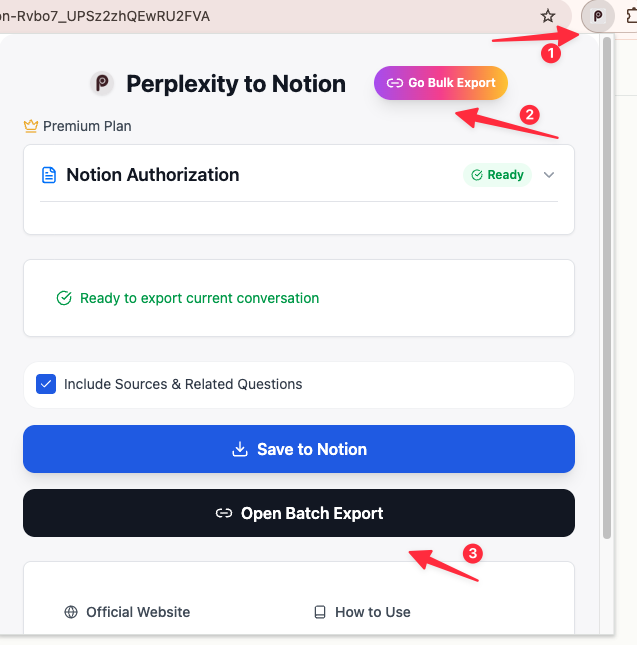
Open the extension options page by clicking “Open Batch Export” button in the popup, or click the extension icon and select “Go Bulk Export”.
Step 1: Connect to Notion
Select your target Notion database from the dropdown menu. If you don’t see your database, click the refresh icon to reload the list.
Step 2: Configure Data Source
Choose What You Want to Export
You can switch between three modes:
- All Threads: Export your normal Perplexity conversation history
- Computer Tasks: Export Perplexity computer task threads and workflow outputs
- From Spaces: Export conversations from one or multiple Spaces
Choose the mode that matches the backup you want before loading items.
Use Spaces Filter
Enable “Use Spaces” to filter conversations by Perplexity Spaces:
- Toggle “Use Spaces” ON
- Click “Load Spaces” to fetch your Spaces
- Select one or multiple Spaces to export from
- Only conversations from selected Spaces will be loaded
Use Date Filter
Enable “Use Date Filter” to export items from a specific date range:
- Toggle “Use Date Filter” ON
- Select a start date
- Only items updated after this date will be exported
Step 3: Configure Sync Settings
Sync Configuration
Choose what happens when an item already exists in Notion:
- Skip: Leave existing pages unchanged (recommended)
- Overwrite: Replace existing pages with new content
- Duplicate: Create new pages even if they already exist
Skip Exported Records
Enabled (Recommended):
- Skips items that have already been exported
- Preserves your manual edits in Notion
- Speeds up repeat export runs
- Works well with Auto-Sync
Disabled:
- Re-exports all items in the selected range
- Overwrites or duplicates items depending on your sync mode
- Useful when you want a fresh full backup
Include Sources & Related Questions
ON: Includes Sources and Related Questions in the export, preserving full research context
OFF: Exports only the main conversation content
Step 4: Load Items
- Click “Load Threads” to load the first page of items
- Review the loaded conversations or tasks
- Select items to export by checking the boxes
- Click “Load More” to load additional pages
- Or click “Load All” to fetch everything available for the current mode
Step 5: Start Export
Export Selected Items
- Select items by checking the boxes
- Click “Export Selected” button
- Monitor the progress bar and status messages
- Wait for export to complete
Export All Matching Items
- Click “Export All History” button
- The extension will automatically load and export all matching items
- Monitor the progress bar
- Wait for export to complete
Important: Keep the options page open during export. Do not close the browser or navigate away.
Export Results
After export completes, you’ll see a summary:
- Success Count: Items saved successfully
- Failed Count: Items that failed to save
- Skipped Count: Already-exported items (if skip enabled)
- Direct Links: Click to view saved pages in Notion
Export History
View all past export operations:
- Scroll down to “Export History” section
- See details for each export:
- Timestamp
- Export scope (Selected Items / All History)
- Success/failed/skipped counts
- Direct links to exported pages
- Available actions:
- View details
- Clear all history
- Export history data as JSON
Performance & Limits
Free Tier:
- 10 exports per day
- Quotas reset daily
Subscribed Users:
- Unlimited exports
Performance Tips:
- Average: a few seconds per item, depending on content size
- Keep Perplexity tab active during export
- Stable internet connection required
- For recurring backups, consider enabling Auto-Sync after your first successful batch run
Automatic Metadata
Exported items are automatically tagged or annotated for easier filtering:
- Space Name: Perplexity Space name (if using Spaces filter)
- Export Date: Timestamp of export
- Task Context: Helpful task metadata when exporting computer tasks
Troubleshooting
“Perplexity page required”:
- Open https://www.perplexity.ai in a tab
- Refresh the page
- Reopen batch export
“Extension not connected”:
- Refresh your Perplexity tab
- Wait a few seconds
- Try again
“Could not find page with ID”:
- Database may have been deleted
- Re-authorize Notion connection
- Select a different database
Export stops midway:
- Check internet connection
- Ensure Perplexity tab is active
- Refresh Perplexity page and retry
Some items failed:
- Check export history for error details
- Failed items can be retried individually
- May be due to rate limits or network issues
Best Practices
- Start small: Test with a few items first
- Use skip mode: Preserves your Notion edits
- Monitor progress: Don’t close browser during export
- Check results: Review export history after completion
- Use the right mode: Switch between normal threads, Spaces, and computer tasks depending on what you are archiving
FAQ
Q: Can I export while using Perplexity? A: Yes, but keep the tab active. Don’t navigate away during export.
Q: What happens to my Notion edits? A: With “Skip Synced Records” ON, your edits are preserved. With it OFF, pages are updated based on your sync mode.
Q: How do I export only new conversations? A: Enable “Skip Synced Records” and apply a date filter if needed. Already-exported items will be skipped automatically.
Q: Can I export computer tasks in bulk? A: Yes. Change the data source to Computer Tasks, then load and export tasks the same way you export normal conversations.
Q: Do I need to keep the options page open? A: Yes, the export process requires the options page to remain open. Closing it will stop the export.
For more help, contact chatgpt2notion@gmail.com
Ready to try Perplexity To Notion?
Open the product page for feature details, screenshots, pricing, and the Chrome Web Store install link.